Colored Light Sensor Changing 3 Monitors in Real Time

This tutorial describes the following advanced Arduino Uno project.  This project was exhibited in ISEA2014.  All original coding was done for this project by Christian Kantner.  Moral support and help getting started by Myfanwy Ashmore.

This is an advanced tutorial that should only be undertaken if you have prior Arduino Uno experience, as well as a computer running a recent version of Windows that has 3 HDMI ports.

Step One:

Arduino Uno R3

RGB Color Sensor

Male to Male Jumper Wires

Small Breadboard

3 TV Monitors

One computer running Java version that also has three HDMI ports (caution: many don’t)

Cables

Step Two:

Wiring the color sensor to the Uno

Step Three:

Upload the Arduino sketch called “colorview” included in the downloads folder to the Arduino and load it onto the Arduino.

Step Four:

Setting up the three monitor system

Step Five:

Running the program, enjoy!

All of the code for this project can be downloaded here


RGB Matrix Controlled from Browser

It This tutorial covers how to connect an RGB Matrix to a microcontroller and an Electric Imp, so that the display of the RGB Matrix, when turned on, and in range of connected wifi, can be controlled by internet users remotely by visiting a web page set up for this project.

*Please note, this is an advanced tutorial which should probably only be undertaken by people with prior prototyping/Arduino project experience.

https://vimeo.com/132521259

This is a collaboration with Jesse Gonzalez, who, along with Nargis Dhirani, presented this artwork’s process at ISEA2015.

Step One:

Order your parts online.  We used http://www.adafruit.com.

RGB Matrix

Teensy 3.2

Electric Imp + Aprilboard

Female to Male and Male to Male Jumper Wires (some of both are needed)

Breadboard

USB Battery Power Source + cable

Step Two:

Please note this tutorial and project was created and tested for iPhone (in fact at the time this project was conceived, there was no Android app for the imp), This tutorial cannot guarantee/doesn’t explicitly support/answer questions about trying out this project on android devices.

Create an account at www.electricimp.com.  Download the electric imp app here.

Step Three:

1  wiring the matrix to the teensy and to its power source

2  wiring the imp to the teensy

3  teensy to battery

Step Four:

Create Some Web Pages

There are basically three sets of coding you need to set up in three different places for this project.

  1. You need to upload an Arduino sketch onto your Teensy,
  2. you need to put code on a few webpages,
  3. and you need to put code on The Electric Imp.

All of that code can be downloaded on the below link.


First, let’s set up and publish a web URL specifically for the imp

ours is currently at: http://jtgonz.com/isea-disrupt-app.html if you want to use it as an example.

There are three separate pages of code for the website:

1) the HTML page

2) an embedded Javascript page

3) a CSS link

Download all of the code for this project here


Step Five:

 Now lets upload the Arduino sketch to the Teensy


Step Six:

Getting the Electric Imp working

Step Seven:

Plug in, test, and enjoy!

All this amazing code was written specifically for this project, all by Jesse Gonzalez, who deserves all the credit for making this idea come to life, including the hardware side of this project, as well.


Connecting a Trinket Pro 5V to a Positive Backlight LCD

This tutorial covers how to wire and successfully run Arduino Uno sketches on an RGB negative LCD display using a Trinket Pro 5V USB micro-controller.  Basically, if you can wire your LCD display to an Arduino Uno, it is fairly easy to then substitute in a Trinket Pro 5V in place of the Uno, and end up with a much more compact, more portable setup.  This tutorial can be done by someone with little or no experience with the smaller microcontrollers out there.  I tried a few of the smaller microcontrollers currently available, and found this one to be the easiest to get up and running.  Let’s get started:

This tutorial uses the RGB negative backlit character LCD (along with accompanying 10K potentiometer), and the Trinket Pro 5V, and runs the example sketches in the LiquidCrystal Arduino example library, which can be downloaded here.

Wiring

So let’s wire this up:

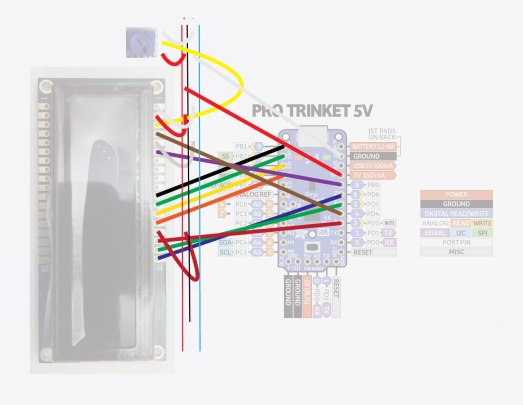
The Adafruit RGB character LCD has 18 pins on either side of it, we will only use one side of pins.  The pins are unlabeled, however they run from pin 1 on its lefthand side to pin 18 on its righthand side.


Let’s start by hooking up the main power and ground wires:

breadboard – column white wire to Trinket Pro Ground

breadboard + column red wire to Trinket Pro 5V 150 mA


Then let’s hook up the potentiometer:

Then you have 2 additional wires to hook up to the poteniometer.  On the included picture, there is a white wire on the lefthand side of the potentiometer going to the – ground column of the breadboard, and a red wire on the righthand side of the potentiometer, going to the + column of the breadboard.  For additional info on the potentiometer, see here.

Plug in your setup and make sure the above connections are on and working, otherwise don’t progress to the rest of the wiring.  If everything’s working, then let’s move through the rest of the LCD pins:


LCD Pin 18 to Trinket Pin 6 blue wire

LCD Pin 17 to Trinket Pin 5 green wire

LCD Pin 16 to Trinket Pin 3 red wire

LCD Pin 15 to breadboard + column (5v) red wire

LCD Pin 14 to Trinket Pin 12 orange wire

LCD Pin 13 to Trinket Pin 11 yellow wire

LCD Pin 12 to Trinket Pin 10 green wire

LCD Pin 11 to Trinket Pin 9 black wire

LCD Pin 6 to Trinket Pin 8 purple wire

LCD Pin 5 to breadboard – column (ground) white wire

LCD Pin 4 to Trinket Pin 4 brown wire

LCD Pin 3 to potentiometer middle yellow wire

LCD Pin 2 to breadboard + column red wire

LCD Pin 1 to breadboard – column white wire


lcdtutorialpinoutdiagram

Plugging Pro Trinket in and Setting it up in Arduino IDE

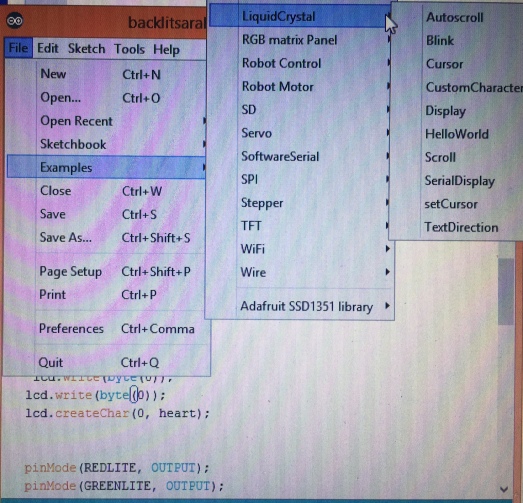
Ok so now your hardware is hooked up, let’s plug it in and get started on the software side.  You need to download the LiquidCrystal library from the Arduino library mentioned above.  Your next step is to update to the latest version of the Arduino IDE, if you haven’t already.  Then you can install the Trinket support addons to the IDE as described here

If you haven’t already downloaded and installed the LiquidCrystal library, do that now.  Then open one of the example sketches, and make sure your settings look something like this:

(Programmer should be set to USBtinyISP, and the Board needs to be set to Pro Trinket 5V/18MHz(USB) as shown below.  The “port” section is grayed out.)FullSizeRender(12)

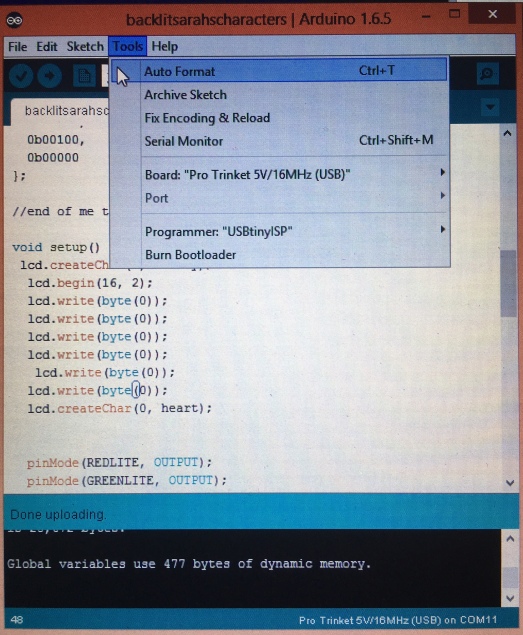
Do note that when you plug in your Trinket Pro for the first time, it shows up in your device manager (if you’re on Windows) under “libusb-win32 devices” as a “USBtiny”.  It does not show up in the COM ports.FullSizeRender(13)


FullSizeRender(14)

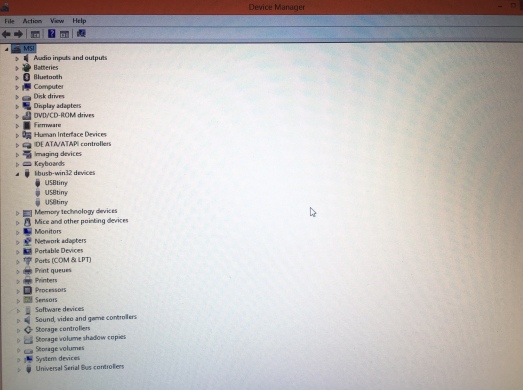
Running an Example Sketch

Lastly, open up one of the example sketches from the LiquidCrystal library, and you will have to make a few simple adjustments to the pin numbers in the code of the sketch.  It’s basically one line of code that needs to be changed.  I have circled it below:

pinoutonsketchpinouttrinket

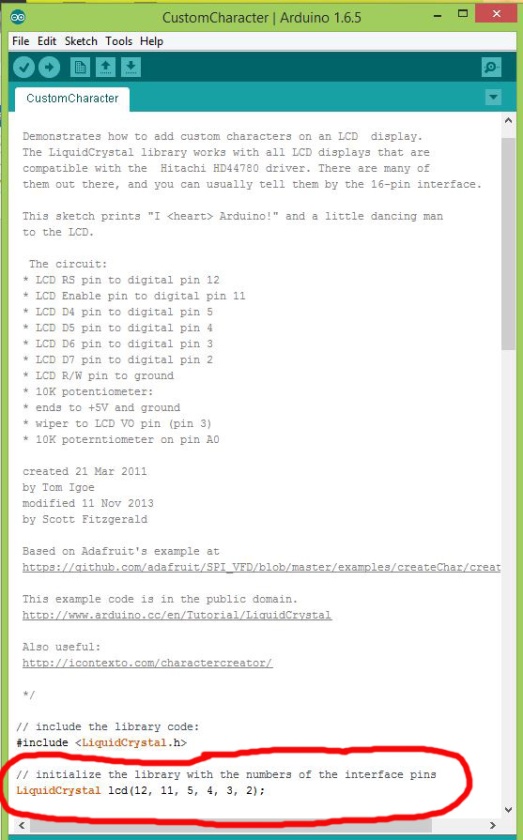
So let’s change that line of code to match our new pinout, to read:

LiquidCrystal lcd(4, 8, 9, 10, 11, 12);

Now we are ready to play the sketch.  If you are new to the Pro Trinket, then we will need to get the hang of successfully uploading to it.  You compile your sketch, then, when you are ready to upload it, click on the trinket itself, it has a little button that causes a red light to flicker and blink.  So click on that little button, then immediately hit “upload” on your Arduino sketch, and…voila!  You now have your first Pro Trinket LCD display running.


This tutorial’s knowledge base is mainly the below tutorial, as well as others mentioned above.

https://learn.adafruit.com/character-lcds

This tutorial was made possible with the help of David Bidle.  (djbidle at my1026.com)


Adding a Form to your Yahoo Website

If you have a yahoo website, here is a simple HTML script you can use to create simple forms.  You can edit the script to give your form the look and feel you want.


See example on: www.vcprojects.net/form.html


So a form talks to your server, and then the server sends an email to you.  Because of that, getting a form to actually work can be a little bit tricky; there are many things with your hosting company that you have to get right in order for a form to work.

You can do javascript forms, css3 forms, html5 forms, php forms, and other types of forms.  There are many scripts available on the internet.  The problem is getting those scripts to work with your server properly.

In our case, mostly our server is yahoo, and I got this script directly from yahoo.

You can find it, too, if you log into your account at smallbusiness.yahoo.com, go into email control panel, and make sure you have set up at least one email for your account.  So set up something like “info@mysite.com” or aisha@aishassite.com or whatever you like.  AFTER you have done that, test it, by sending an email to your new address, and check to see if it’s working.  NEXT, go back into the yahoo account, and do the following:

Screen Shot 2013-07-07 at 8.51.54 AM

go into web hosting control panel,


go into “Create and Update”,

Screen Shot 2013-07-07 at 8.57.25 AM

into “Other Site Building Tools”,

Screen Shot 2013-07-07 at 8.57.40 AM

go into “Add-Ons”,

Screen Shot 2013-07-07 at 8.57.54 AM

and then into “Email Forms”

Then you copy paste the script they generate for you, into a new html page on Dreamweaver, and give it a try.  Once it works, then you can begin customizing how your form looks and what info you are collecting.

Myfanwy Ashmore: Hacking a Mouse Workshop

Myfanwy Ashmore will be working with you on your small group projects in class, on Monday, March 11, and Wednesday, March 13, as well as being available outside of class for helping you complete your projects–

Previous Work Examples:

http://vimeo.com/49216850
http://www.youtube.com/watch?v=SRraRf8jDwY
http://aaidpm.blogspot.ca/2011/04/cristals-mouse-hack-suspenders.html
http://aaidpm.blogspot.ca/2011/04/kathryn-barretts-mouse-hack-final.html
http://www.youtube.com/watch?feature=player_embedded&v=3bu4DL5tS6E#!

Materials:

Software–

There are two softwares that can be used for the multimedia component of the projects. Processing which requires text coding and is more complex, and Scratch which is very easy to use. (Processing can be downloaded from processing.org and scratch is available at scratch.mit.edu) They both have advantages and disadvantages.

Hardware–

Supplies:

supplies list

Instructions:

This workshop is an intro to hardware modification but could be built upon further. The next logical progression would be a keyboard hack which would provide more inputs, or a game controller hack eventually moving into programming a micro-controller like an Arduino where the designer/maker would have significantly more control & available complexities.

I will prepare some sample code that could be used as is with little modification, and will walk them through it. We will likely start with Scratch, because it is very straightforward and if they are keen we could use Processing. Processing is very popular with media artists but it is something that can take quite some time to learn as it is basically programming in Java. They could start to familiarize themselves with Scratch and Processing if they have some free time. There are some built in examples & tutorials that will give them a sense of what these softwares can do.
The actual modification of the mouse is relatively straightforward. It requires us to take apart the mouse, de-solder the buttons and solder in some pin headers with very long wires attached. The long wires then end up being attached to some other conductive material of the students choice. An example might be – conductive fabric stitched into some soft sculpture. Could be anything conductive – two pop cans, a that you touch together, metal tabs mounted inside a doorway that are released when the door opens, a tilt switch which requires something to be tilted.

mousehack_smaller